SmartAttach
This powerful feature lets you extract email attachments to groupware and replace them with URLs within email bodies. Pre-defined text with a link to the appropriate folder is added into an email body (its header or footer respectively). Pre-defined text files can be of either HTML or plain text formats. When the filter is active, this action is performed with both incoming and outgoing emails. So sending out large mailing lists with big attachments (up to 2GB - this limit applies to WebClient (php.ini) upload size) is not an issue anymore.
Content Filters are used to define the conditions when SmartAttach is performed. These filters parse emails and perform various actions with their content, headers, footers, attachments, etc.
Why to Use SmartAttach Filter
There are these reasons for the filter use:
- To avoid email inbox overfilling.
- To improve (not to worsen, respectively) server connectivity outgoing emails can be sent without large attachments, just with links to them. Only those recipients who want to download attachments deal with them.
- To prevent email rejection by a server because of attachment size.
- To have possibility to delete attachments even after the message has been sent.
Example
Users use mailing lists. These lists can be very extensive. Users do use them regardless of the fact that some recipients (servers) can use attachment rejection policy. The SmartAttach filter is the solution.
Files Folders
Attachments are stored in Files folders. The files folders are connected to defined accounts. It is possible to define any amount of file type folders. For information about IceWarp WebClient's File folders, refer to the IceWarp WebClient section.
Variables in Predefined Text
These variables can be used in the resulting email after the SmartAttach content filter has been applied for creation of links that refer to extracted files.
Supported variables are:
- %url%
- %file%
- %index%
- %expire%
- %size%
- %expiredate%
On-server Setup
To set this filter, do the following:
- In the navigation panel, click the Mail Service - Rules - Content Filters nodes.
In the Content Filters tab click the Add button.
The Rule dialog appears.
- Do one of the following:
To apply SmartAttach globally for all system accounts, select the All messages, or Where message contains attachment, in the Conditions frame.
To apply SmartAttach for a domain or selected user(s), select Where sender matches some words and specify either the domain name or user names.
To apply SmartAttach based on attachment size, add the condition Where message is size, click size in the lower panel and define the size limit.
Note: If you enable SmartAttach for multiple recipients using multi-select condition within a single content filter, they will all share a common storage and other settings as defined further.

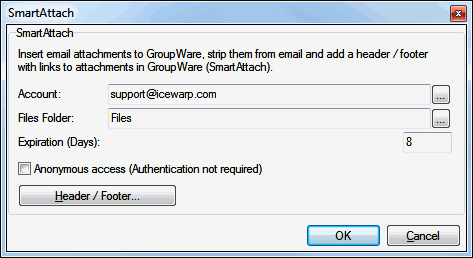
Figure. SmartAttach.
- Select the account under which attachments will be saved, so that you can manage them in one place in case of groups and domains.
On the right side of the Account field, click the
 button.
The Select Item dialog appears.
From the Domain combo box, select the appropriate domain. From the Account type combo box, select the appropriate type. In the frame, select the appropriate account and click the Select Account button.
The SmartAttach dialogue box appears again.
- Use the "..." button next to the Files Folder field to select the appropriate folder of the above account where to store the attachments.
- Into the Expiration (Days) field, write number of days attachments will be stored for. The attachments will be removed automatically after the specified time. Use 0 for unlimited expiration (never deletes attachments automatically).
- If you want to enable anonymous access, select the Anonymous access checkbox, otherwise the recipient will need to authenticate with the credentials of the above selected account in order to download the attachment.
- If you wish to customize the format of the resulting email by defining own headers and footers, click the Header/Footer... button and locate text (any extension) and HTML (html extension) parts of your customized header and footer.
- In the Rule dialogue box, fill in the rule name into the Title field and click OK.
In the filter frame, the new rule name appears.
Warning: If you want to use SmartAttach, WebDAV has to be active and its URL has to be set properly.
IceWarp WebClient
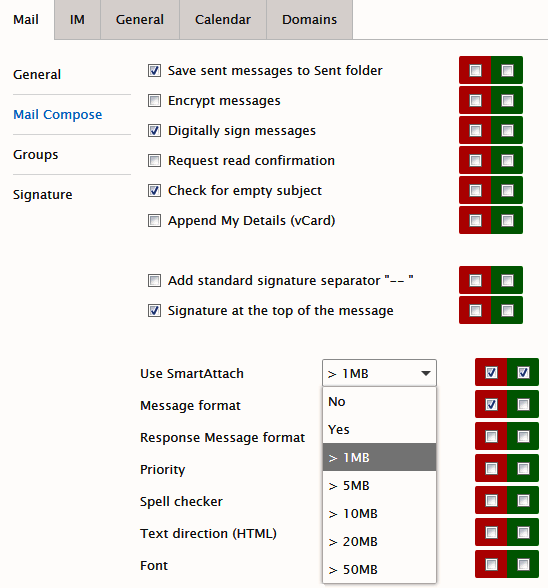
As a domain (or server) administrator, you can enforce domain (server respectively) users to use SmartAttach within the Administrator Options dialog > Mail > Mail Compose tab.
Select the appropriate value of an attachment size from the Use SmartAttach list. (Yes means that all attachments will be extracted. Do not forget to Check checkboxes, if they are not.)

Figure. Forcing SmartAttach to users.
Users can set this function for themselves on the same tab of the Options dialog. The extracted attachment is saved into the user's Files folder.
Note: If both the server SmartAttach content filter and WebClient SmartAttach are applied, the extracted attachments are stored within individual user's Files folders. The appropriate path is similar: IceWarp\mail\[domain]\[user]\~gw\attachments\.
"Hidden" SmartAttach
For end users, it can be a bit annoying/confusing to have to deal with the SmartAttach information and links. IceWarp Server provides the feature that moves attachment links to the Attachments field. The SmartAttach technology is still used but the SmartAttach information text is not present. Email messages look like they contain "real" attachments.
For deeper insight:
New email message headers are used:
X-IceWarp-SmartAttach: size=; name=""; url=""; [all="true"]
One header is used for each attachment plus one for Download All. IceWarp Server deals with these links and places attachment links properly. In the message HTML code, the <div class="smart-attach">....</div> tag is used. When the server recognizes SmartAttach headers, this tag (that includes whole SmartAttach HTML header) is hidden.
Note: Third parties servers that do not support this enhanced SmartAttach feature, use the usual SmartAttach as shown above.

